The post Typed object parsing with Yup cast first appeared on Oimmei Digital Consulting.
]]>There are plenty of potential data sources you may use: web APIs, SDKs, documents from the file system, the browser window’s localStorage, a query string. For instance, you could have to retrieve data serialized in some text form, perhaps even data you previously saved somewhere yourself in order to store a preference for the user of your application.
Retrieving this kind of information, regardless of how you do it, is usually easy enough: you just query the data source, get the item or the list you’re looking for and that’s it.
.…or is it?
JavaScript is a dynamically typed language and, even though you could and probably should use TypeScript – like we do – as a helping tool to identify type errors before it’s too late, variables and properties will still have dynamic typing at runtime. For this reason, you may find yourself dealing with values you don’t expect, especially when querying text-based data sources.
Typically, this happens with numeric fields, but every kind of non-text value is potentially affected: you have a numeric value stored somewhere, you fetch it from the data source, and you use it in a strict comparison or in some function expecting to be playing with a number, only to then find out it’s actually a string, often leading to sneaky and obscure bugs. Let’s see an example of that.
Here’s a very common situation for anyone working in web development: we’re creating a React web app that stores a delicious pizza in the query string, and later retrieves its data to display them to the user. Boy, if I had a nickel.
Let’s start by instantiating a create-react-project with TypeScript, just the way we like it, and let’s get to work.
npx create-react-app react18-typed-parsing --template typescript
We’ll add a few libraries, as well. Specifically Qs, to serialize and deserialize objects in the query string, along with react-router and react-router-dom o manipulate said query string, of course with the related type declarations.
npm install qs react-router react-router-domnpm install -D @types/qs
First off, let’s create a data model for our pizza, with a numeric ID and a pair of text fields.
// src/models/Pizza.ts
export interface Pizza {
  id: number

  name: string

  description?: string
}
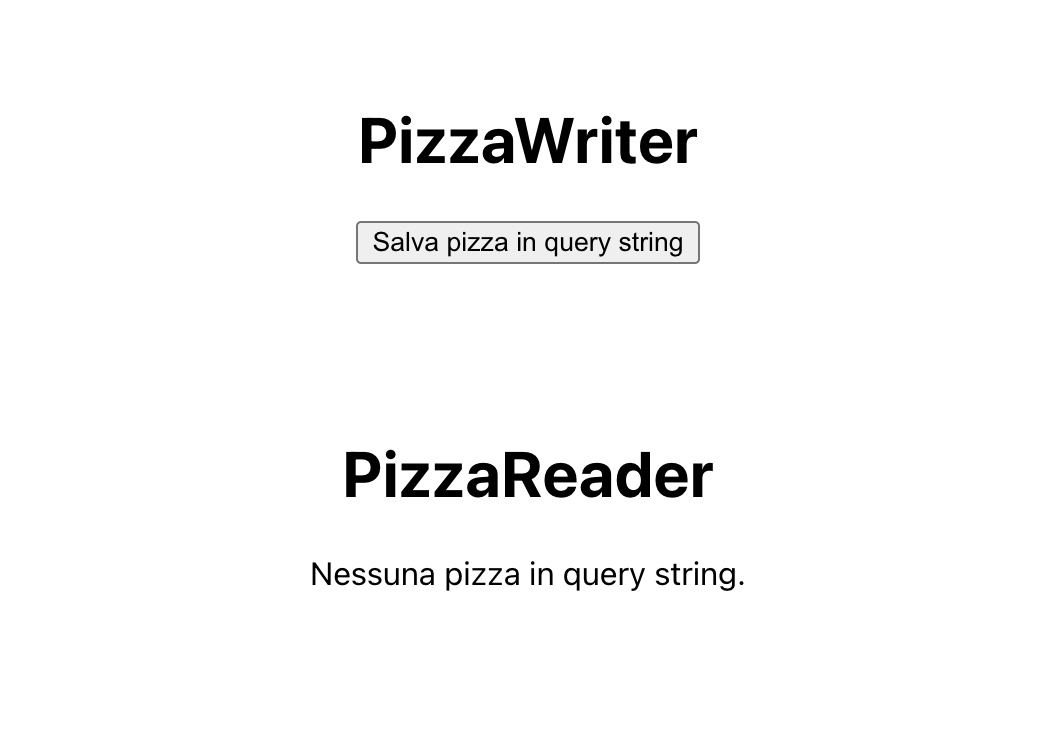
Our web app will consist mainly of two components.
- PizzaWriter will take a Pizza and set it in the query string.
- PizzaReader will wait for a Pizza to appear in the query string. As soon as that happens, it will instantly consume the thing and show its data to the user, kind of like me when the Just Eat rider arrives.
The components will be inside the container PizzaWrapper…
// src/pages/PizzaWrapper.tsx
import React, {ReactElement} from 'react';
import PizzaWriter from '../components/PizzaWriter';
import PizzaReader from '../components/PizzaReader';

const PizzaWrapper = (): ReactElement | null => {
  return (
    <>
      <PizzaWriter/>
      <PizzaReader/>
    </>
  );
}

export default PizzaWrapper;
…which will act as the root component.
// src/App.tsx
import React from 'react';
import {
  createBrowserRouter,
  RouterProvider,
} from "react-router-dom";
import './App.css';
import PizzaWrapper from './pages/PizzaWrapper';

const router = createBrowserRouter([
{
    path: '/',
    element: <PizzaWrapper/>,
  },
]);

function App() {
  return (
    <RouterProvider router={router}/>
  );
}

export default App;
PizzaWriter is pretty simple: when a button is clicked, it serializes a Pizza object using Qs and sets it in the query string using the hook useSearchParams from react-router-dom. useSearchParams.
// src/components/PizzaWriter.tsx
import React, {ReactElement} from 'react';
import {useSearchParams} from 'react-router-dom';
import Qs from 'qs';
import {Pizza} from '../models/Pizza';

// The pizza to be delivered via query string.
const pizzaToWrite: Pizza = {
  id: 1,
  name: 'Pepperoni',
  description: 'So good!',
};

const PizzaWriter = (): ReactElement => {
  // Function to manipulate the query string.
  const [, setSearchParams] = useSearchParams();

  // Saving the pizza in the query string on click.
  const savePizzaInQueryString = (): void => {
    setSearchParams(Qs.stringify(pizzaToWrite));
  }

  return (
    <div className={'querystring-writer'}>
      <h1>PizzaWriter</h1>
      <button onClick={savePizzaInQueryString}>
        Save pizza in query string
      </button>
    </div>
);
}

export default PizzaWriter;
PizzaReader is where things start to get tricky. Basically, we want to listen to the query string, again using useSearchParams, so we’re ready to get a Pizza and set it in the state. b The component is expecting a pepperoni pizza, so let’s also check the ID to make sure the item is exactly the one that was ordered.
The question now is: how do we make sure the object we’re getting is actually a Pizza?
// src/components/PizzaReader.tsx
import React, {ReactElement, useEffect, useState} from 'react';
import {useSearchParams} from 'react-router-dom';
import Qs from 'qs';
import {Pizza} from '../models/Pizza';

// The pizza we're expecting to find in the query string.
const pizzaToRead: Pizza = {
  id: 1,
  name: 'Pepperoni',
  description: 'So good!',
};

const PizzaReader = (): ReactElement | null => {
  const [searchParams] = useSearchParams();

  // The pizza retrieved from the query string, if any.
  const [pizza, setPizza] =
    useState<Pizza | null>(null);

  useEffect(() => {
    // Parsing the pizza in the query string.
    const pizzaRaw = Qs.parse(searchParams.toString());

    // TODO: what now?
  }, [searchParams]);

  // Displaying information about the pizza, if any.
  return (
    <div className={'querystring-reader'}>
      <h1>PizzaReader</h1>
      {pizza !== null ? (
        <div className={'pizza-info'}>
          <div>
            <div className={'bold'}>ID</div>
            <div>{pizza.id}</div>
          </div>
          <div>
            <div className={'bold'}>Name</div>
            <div>{pizza.name}</div>
          </div>
          <div>
            <div className={'bold'}>Description</div>
            <div>{pizza.description}</div>
          </div>
          <div>
            {/* If this is a pepperoni pizza, meaning the one we expect, saying Yes. */}
            <div className={'bold'}>Pepperoni</div>
            <div>{pizza.id === pizzaToRead.id ? 'Yes' : 'No'}</div>
          </div>
        </div>
      ) : (
        'No pizza in the query string :('
      )}
    </div>
  );
};

export default PizzaReader;
A possible approach is to define a custom type guard, so we can check for the object to have the properties we expect.
// src/helpers/pizzaHelper.ts
import {Pizza} from '../models/Pizza';

// Type guard to make sure any object is a Pizza.
export const isPizza = (obj: any): obj is Pizza => {
  return 'id' in obj && 'name' in obj && 'description' in obj;
}
Let’s try using this to complete the effect in PizzaReader
import {isPizza} from '../helpers/pizzaHelper';

 …

  useEffect(() => {
    // Parsing the pizza in the query string.
    const pizzaRaw = Qs.parse(searchParams.toString());

    // If the object is a pizza, saving that in the state.
    if (isPizza(pizzaRaw)) {
      setPizza(pizzaRaw);
    }
  }, [searchParams]);
According to TypeScript, everything is fine. If we run our web app using…
npm run start
…and open the browser, we’ll see PizzaReader ready to receive its hard-earned Pizza.
Let’s press the button to deliver our marvelous baked disc of dough, and let’s see what changes.
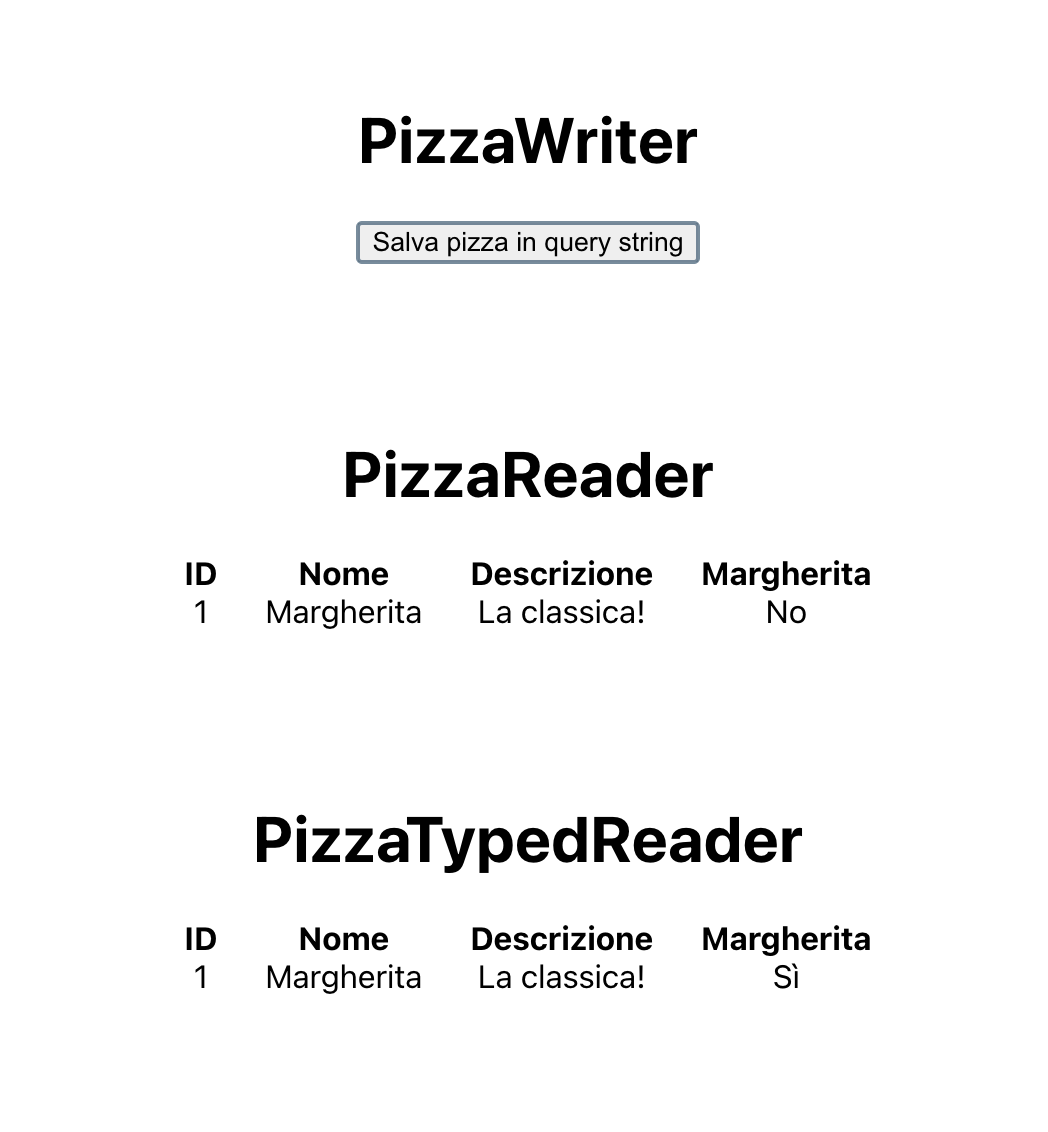
The result may appear satisfying at first glance, but something’s not right. The data are correct, except for the fact that PizzaReader doesn’t realize this is a pepperoni pizza. Why is that?

The answer is in the comparison we made on the ID.
<div>
            {/* If this is a pepperoni pizza, meaning the one we expect, saying Yes. */}
            <div className={'bold'}>Pepperoni</div>
            <div>{pizza.id === pizzaToRead.id ? 'Yes' : 'No'}</div>
          </div>
Here’s the issue: pizzaToRead was defined in our own code according to its interface, while pizza is retrieved from the query string. In the former, the ID is a number; in the latter, however, since a query string doesn’t have any indication about typing, every property is a string. Thus, the strict equality operator returns false; the types are different, even though TypeScript has no way to know beforehand.
Solving this situation is not as easy as it may look. Sure, for such a simple case we could resort to a plain equality operator, but what about complex scenarios? What if we have to use a specific method from the String or the Number prototype?
One might try refactoring the type guard isPizza to be more strict, so it checks the types of the properties as well as their existence, but that would cause the web app to think the object in the query string is not a Pizza at all, leaving poor PizzaReader on an empty state – and stomach. So? Do we have to create some complex parser function for every interface in our project?
No: there is a quicker and safer way, and it comes from the Yup library.
If you’re already used to React, you’ve likely heard about Yup. It’s one of the most popular libraries around when it comes to form validation, often used alongside Formik. Form validation is not the only thing Yup is good at, though: right now, we’re looking for the cast method. It’s a feature that, given a value which may or may not be an object, attempts to build a second value which respects a specific schema, just like the schema you’d use while validating a form.
Let’s install Yup and its type declarations…
npm install yup
npm install -D @types/yup
…and add a Yup schema next to the Pizza interface.
// src/models/Pizza.ts
import * as yup from 'yup';

export interface Pizza {
  id: number

  name: string

  description?: string
}

// Yup schema for a Pizza object.
export const pizzaSchema = yup.object({
  id: yup.number().required(),
  name: yup.string().required(),
  description: yup.string(),
});
Finally, we’ll add a third component, PizzaTypedReader. Its structure will be the same as PizzaReader, only the value from the query string will be parsed using the schema.
import React, {ReactElement, useEffect, useState} from 'react';
// src/components/PizzaTypedReader.tsx
import {useSearchParams} from 'react-router-dom';
import Qs from 'qs';
import {Pizza, pizzaSchema} from '../models/Pizza';

// The pizza we're expecting to find in the query string.
const pizzaToRead: Pizza = {
  id: 1,
  name: 'Pepperoni',
  description: 'So good!',
};

const PizzaTypedReader = (): ReactElement | null => {

  …

  useEffect(() => {
    // Parsing the pizza in the query string.
    const pizzaRaw = Qs.parse(searchParams.toString());

    // Trying to parse a pizza with Yup.cast.
    try {
      const newPizza = pizzaSchema.cast(pizzaRaw) as Pizza;

      // The object is a pizza.
      setPizza(newPizza);
    } catch (error) {
      // The object is *not* a pizza.
      setPizza(null);
    }
  }, [searchParams]);

  …
};

export default PizzaTypedReader;
The cast method takes the object from the query string and returns a new object respecting the given schema, but only if the input is suitable for casting according to said schema. In this case, for instance, the numeric string ‘1’ is cast to the number value 1, because the schema asserts the id property must be a number. If an incompatible value, like a non-numeric string, was provided, or a required property was missing, an error would be thrown. So, if the method is successful, we can be sure newPizza is actually a Pizza, with a little type assertion to make TypeScript happy.
Let’s add the third component next to the other ones…
// src/pages/PizzaWrapper.tsx
import React, {ReactElement} from 'react';
import PizzaWriter from '../components/PizzaWriter';
import PizzaReader from '../components/PizzaReader';
import PizzaTypedReader from '../components/PizzaTypedReader';

const PizzaWrapper = (): ReactElement | null => {
  return (
    <>
      <PizzaWriter/>
      <PizzaReader/>
      <PizzaTypedReader/>
    </>
  );
}

export default PizzaWrapper;
…and try again.
Now we’re talking! The new ID is a number, and the strict comparison returns true.
We can use Yup cast in any situation to make sure the values we get at runtime are actually typed like we expect in your code. Regardless of whether we have a scalar value, an object, or an array of objects, it doesn’t matter the complexity of the schema. This allows us to validate the structure of data retrieved from untrustworthy sources, like the localStorage , a query string or any storage that could be easily manipulated by a malicious user. Don’t rely too much on it, though: this feature can only validate the type of your data, not the actual content, so stay alert. the full project repository on Github. As for me, I think I’ll order a pizza.
The post Typed object parsing with Yup cast first appeared on Oimmei Digital Consulting.
]]>The post TypeScript: 5 More Tricks for Development first appeared on Oimmei Digital Consulting.
]]>Well, all of the above happened to us. Many times, actually. Enough to make me wonder if there is any better tool for developing and maintaining web projects. Something that makes it easier to find errors while using data structures, for instance.
Luckily, the answer is yes, and this tool is TypeScript! Open source syntactical superset of JavaScript developed mostly by Microsoft, TypeScript adds to every browser’s favorite programming language a lot of new tools and features, mainly static typing, to make web projects easier to build and maintain.
You most likely already know all of this, especially if you often hang out on this blog. Not only because of the incredible popularity reached by TypeScript in the last few years, but also because right on this website there’s already an article of mine discussing some interesting features of this language. Back when I wrote it I talked about a potential sequel, and here it pops up just like a “Cannot read property of undefined” error in a JavaScript program.
Let’s get into it, then. Five sections, five TypeScript tools you may or may not know, with full examples and links to the official playground for version 5.1. Here we go.
Tuple
This one is really simple, but I bet it’ll be new to somebody.
Everyone who works with TypeScript knows how to statically type arrays: you just set the type of the elements, and then add the square brackets afterwards.
const numberArray: number[] = [];

// Valid:
numberArray.push(1);
numberArray.push(2);

// Not valid:
numberArray.push("string");
What’s not so obvious is that you can use type definitions as a simple way to create tuples – already mentioned in the previous article -, meaning ordered lists of non-unique elements. Here’s a tuple of three numbers.
// Valid:
const numberTuple1: [number, number, number] = [1, 2, 3];

// Not valid:
const numberTuple2: [number, number, number] = [];

// Not valid:
const numberTuple3: [number, number, number] = [1, 2, 3, 4];
The good thing about tuples is that, as you can see from the snippet, static typing allows TypeScript to validate the cardinality of the list, not just the type of its elements. This ensures that the data structure always contains exactly the elements you expect in the positions you expect.
Tuples have plenty of applications in JavaScript projects. In React, for instance, they’re useful for defining state variables that keep in one simple structure a bunch of values tightly related to one another, so you can easily read and update it without making the related component too verbose, especially with hooks.
Finally, it’s worth pointing out that tuples can contain diverse data of any type, even complex ones – including other tuples, if you want to be creative!
interface ResponseBody {
  title: string
  content: string
}

// This tuple contains an HTTP code, a
// response message and the response body.
const apiResponse: [number, string, ResponseBody] = [
  200,
  "success",
  {
    title: "Title",
    content: "Content",
  },
];

// Getting the items with a destructuring assignment
// (https://developer.mozilla.org/en-US/docs/Web/JavaScript/Reference/Operators/Destructuring_assignment).
const [statusCode, message, body] = apiResponse;

console.log(statusCode);
console.log(message);
console.log(body);
Utility types: Readonly e NonNullable
Utility types! Remember them? I already talked about a couple of these type modifiers in the previous article. Today we’ll look at two more of them, often overlooked but far from useless.
Readonly is a modifier that creates a read only version of a given type. If you have the interface for an object, for example, this utility type can make sure none of the properties can be reassigned after the object is created.
// Interface for an item with an ID and a title.
interface SomeInterface {
  id: number

  title: string
}

// SomeInterface object:
const someObject: SomeInterface = {
  id: 1,
  title: "Title",
};

// Readonly SomeInterface object:
const someReadonlyObject: Readonly<SomeInterface> = {
  id: 2,
  title: "Readonly title",
};

// Valid:
someObject.title = "Another title";

// Not valid:
someReadonlyObject = "Yet another title";
This can look sort of useless, but think about all the times you deal with values that should be read only: objects that contain some sort of configuration parameters, the state of a React component, the state of a Redux store or data related to any library that relies on regular JavaScript comparisons in order to trigger some event in your application. Thanks to Readonly, TypeScript itself can help you deal with this data by throwing an error whenever you reassign a value that shouldn’t be reassigned. It’s like const, but deeper!
NonNullable is a modifier that excludes null or undefined from a union type. I don’t think this one needs much of an explanation: it’s useful when you have a type, like the type of an interface property (you do remember you can access the type of a property, right?), that can be empty but you need to initialize it to a non-empty value.
interface SomeInterface {
  // In this interface, value may be empty.
  value: number | null | undefined
}

// I'll initialize a variable I'll use as my value,
// but this time I need it to not be empty.

// Valid:
const val1: SomeInterface["value"] = null;

// Not valid:
const val2: NonNullable<SomeInterface["value"]> = null;

// Valid:
const val3: NonNullable<SomeInterface["value"]> = 10;
Generic types: default type, constraints, conditional types
Whoever worked with programming languages like Java or C# – also known as Microsoft Java – definitely knows what generics are. For anybody else, meaning all developers who still have some of their sanity, generics allow you to create software components that may accept a variety of different types, with the specific type provided by the component user, while still taking advantage of static typing.
// Let's say you need to write a function that takes any input parameter
// and returns it. Without generics, this is the best you can do.
function identityAny(param: any): any {
  return param;
}

// But *with* generics:
function identity<T>(param: T): T {
  return param;
}

// Valid:
console.log(identity<string>("string"));
console.log(identity<number>(42));

// Not valid:
console.log(identity<boolean>(11));

// You can use them for interfaces...
interface GenericInterface<T1, T2> {
  param1: T1

  param2: T2
}

// ...classes...
class GenericClass<P> {
  prop: P

  constructor(propValue: P) {
    this.prop = propValue;
  }

  getProp(): P {
    return this.prop;
  }
}

// ...functions...
function genericFunction<P>(param: P): P {
  return param;
}

// ...and even arrow functions.
const genericArrowFunction = <P,>(param: P): P => param;
The official docs extensively talk about generics, so if you need a more lengthy introduction I recommend giving them a read. In this article, I’ll just mention some interesting things about the topic.
For instance: generic types can be made optional by providing a default value in their declaration, just like with the input parameters of a function. If no type is specified when the component is used, TypeScript will fall back to the default one.
// string is the default type for this interface.
interface GenericInterface<T = string> {
  param: T
}

// Valid:
const value1: GenericInterface = {
  param: "string"
}
const value2: GenericInterface<number> = {
  param: 42
}

// Not valid: TypeScript assumes param is typed as a string.
const value3: GenericInterface = {
  param: 42
}
This feature can be used to introduce generic types into a component that currently has none, or to add more of them next to existing ones, while also keeping said component backward compatible.
Be careful though: setting a default type doesn’t mean constraining the types that can be actually provided upon using the component. The type the user developer provides may be completely different from the default one, as you saw earlier with number and string.
That’s why it’d be a mistake to write something like this.
// An interface of the project.
interface SomeInterface {
  id: number

  name: string
}

// This function has a generic type, with the interface as its default.
function someFunction<T = SomeInterface>(param: T): void {
  // Not valid: there's no way to be sure T and SomeInterface will be compatible.
  console.log(param.name);
}
However, it actually is possible to set a constraint for the types your component will be able to receive. You can do that with the extends keyword, which may also be used along with a default type.
// An interface of the project.
interface SomeInterface {
  id: number

  name: string
}

// This function has a generic type that extends SomeInterface.
function someFunction<T extends SomeInterface = SomeInterface>(
  param: T
): void {
  // Valid: whatever the actual type of T is,
  // it will be compatible with SomeInterface.
  console.log(param.name);
}

// Not valid: number is not compatible with SomeInterface.
someFunction<number>(42);
For complex cases, you can also use conditions to change the static typing for other parts of your components according to the provided types. A classic example: let’s say you have a component that deals with a value, and this value could either be a single item or a list of items with the same type.
With generics, you’re able to handle everything with just one interface like this:
- create an interface with two generic types, the type of the item T and a (constrained) boolean type Multiple;
- define the value property and the onChange callback, called whenever the value changes;
- set a condition for the type of the properties so it changes according to the type provided for Multiple by using extends.
Here’s the result.
// Multiple constrained on a boolean type, non-multiple as a default.
interface ComponentProps<T, Multiple extends boolean = false> {
  // The value is a single item or an array.
  value: Multiple extends false ? T : T[]

  // onChange gets a single item or an array as an input parameter.
  onChange: (newValue: Multiple extends false ? T : T[]) => void
}

// Object for the non-multiple case (using the default for Multiple):
const singleValueComponentProps: ComponentProps<string> = {
  value: "I'm just one string!",

  onChange: (newValue) => {
    console.log(
      "This will always print TRUE:",
      typeof newValue === "string"
    );
  },
};

// Object for the multiple case:
const multipleValueComponentProps: ComponentProps<string, true> = {
  value: ["I'm", "an", "array", "of", "strings", "now!"],

  onChange: (newValue) => {
    console.log(
      "Safely using the array methods, since newValue is an array:"
    );

    newValue.forEach((currentValue) => console.log(currentValue));
  },
}
Type narrowing: type predicates
After mentioning it in the first article, let’s talk some more about type narrowing. And today, let’s try and give this extremely important feature the respect it deserves.
First off, a recap of what I said last time while discussing discriminated unions: type narrowing is basically the mechanism that allows TypeScript to infer what type a variable will be at runtime in a specific part of the code, using the static typing you defined and the flow of your program, so the transpiler can present the appropriate errors to you while turning your code into JavaScript. That’s all fine and good, but what I did not emphasize last time is how freaking powerful and ubiquitous type narrowing is in TypeScript, and how often we all take advantage of it without even realizing.
Think about a function with a parameter that can either be a string or a number. If it’s a string, you want to display its length; if it’s a number, you want to display it with fixed-point notation. Most JavaScript developers will naturally end up writing something like this, using the typeof operator.
function someFunction (value: string | number): void {
  if (typeof value === "string") {
    // Printing the length:
    console.log("Length of the string:", value.length);
  } else {
    // Printing the value:
    console.log("Value:", value.toFixed());
  }
}
That’s simple, right? Nevertheless, a number of non-trivial things are happening beneath the surface.
In the function signature, value is typed as being either a number or a string, thanks to a lovely union type. In the branches of the if construct, though, the code takes advantage of features that aren’t common to these two types: in the then branch it uses length, which doesn’t exist for number; in the else branch it uses toFixed, which doesn’t exist for string.
If you try and remove the if, both of its former branches understandably throw an error.
function someFunction (value: string | number): void {
  // Printing the length:
  console.log("Length of the string:", value.length);
  // Printing the value:
  console.log("Value:", value.toFixed());
}
And yet, TypeScript doesn’t have any issue in the first version of the snippet. What’s happening here?
The answer is type narrowing. TypeScript analyzes the flow of your code, and infers that, while executing a specific line, the type of a value will be more restrictive than the one you explicitly declared.
The typeof operator, for instance, is one of the so-called type guards, meaning special checks which have an effect on the typing deduced by TypeScript for a given value. That’s why the first version of the snippet works: starting from the union type string | number, TypeScript looks at the if condition and realizes that value will be a string for the duration of the then branch and, by exclusion, it will be a number in the else branch.
Type narrowing is a crucial feature in TypeScript projects, and it applies to a lot of different operators and constructs: typeof operators, comparisons, assignments, in operators, instanceof operators, if constructs, switch constructs…
But you’re not looking for lengthy explanations about the inner workings of TypeScript. You’re here to find some tips you can use in your code and tell other people at parties in order to win respect and admiration from your friends, and I won’t let you down.
(Warning: knowing the following information may not actually lead to winning respect and admiration from your friends. The author of this article declines every responsibility for your poor social skills.)
Sometimes, taking advantage of type narrowing may be harder than usual. Sure, as long as we’re talking about primitive types such as strings or numbers, or built-in utilities such as Date, things are easy and straightforward, but… what about user-defined interfaces?
TypeScript interfaces, as useful as they are, have a pretty big downside: they don’t exist at runtime. Actually, they don’t exist at all, since JavaScript has no such construct at the time of writing. They’re only meant to help developers catch static type errors, but they don’t survive transpilation in any form. So no, One does not simply use instanceof with TypeScript interfaces; narrowing takes a bit of extra effort for those.
A pretty standard situation: you have an interface SomeInterface, a second interface SomeExtension which extends the former, and a function that receives a SomeInterface object as an input. Since inheritance is in place, the input parameter may be a SomeExtension object; let’s say you want to perform some additional operation if that happens. You may try and use the in operator to check for an extension property, but sadly it won’t be enough.
interface SomeInterface {
  id: number

  title: string
}

interface SomeExtension extends SomeInterface {
  description: string

  content: string

  otherFields: Record<string, any>
}

function someFunction (obj: SomeInterface): void {
  // Printing every property to the console.
  // Valid:
  console.log(obj.id);
  console.log(obj.title);

  if ("description" in obj) {
    // The in operator let us use description...
    console.log(obj.description);

    // ...but it's not enough to convince
    // TypeScript that obj has type SomeExtension.
    console.log(obj.content);
    console.log(obj.otherFields);
  }
}
(Up to TypeScript 4.8, even accessing description this way would have resulted in an error. Starting from version 4.9, type narrowing was slightly reworked, meaning you can access the property you explicitly check with in, even though the inferred type for it will be unknown.)
What you need to do here is make TypeScript understand that you’re rightfully accessing the extension properties, or, in other words, that you’re using those properties only when obj actually has type SomeExtension. Fortunately, this can be done with type predicates.
Type predicates let you define custom type guards, based upon arbitrarily complex conditions, which assert that a specific variable will be the given type in a specific code block – just like with typeof, but the logic is entirely defined by the developer.
So, here’s how you can solve the extension problem: create a function (isSomeExtension) that receives a SomeInterface object, and returns a type predicate asserting the input parameter is a SomeExtension object. The function body has to examine the input parameter to establish if the predicate is correct – or, as someone could say, if the parameter walks and quacks – and return true if it is, and false if it isn’t.
Finally, use that function inside the if condition for someFunction.
interface SomeInterface {
  id: number

  title: string
}

interface SomeExtension extends SomeInterface {
  description: string

  content: string

  otherFields: Record<string, any>
}

function isSomeExtension (value: SomeInterface): value is SomeExtension {
  // If value contains description, it's a SomeExtension object.
  return "description" in value;
}

function someFunction (obj: SomeInterface): void {
  // Printing every property to the console.
  // Valid:
  console.log(obj.id);
  console.log(obj.title);

  if (isSomeExtension(obj)) {
    // Valid: TypeScript acknowledges obj is a
    // SomeExtension object in this part of the code.
    console.log(obj.description);
    console.log(obj.content);
    console.log(obj.otherFields);
  }
}
Yay!
An important note to close this long paragraph: keep in mind that type predicates let you pretty much “skip” the built-in type checking system. When a type predicate is in place, TypeScript will entirely trust your own type guard. That means you have to be extra careful while writing the function body: if something’s wrong in there, you won’t realize it until you notice a bug at runtime.
Function overloading
If you’re used to programming languages like Java, you should be familiar with method overloading. It’s a feature that allows you to create different methods with the same name and a different parameter list inside a class or an interface. That way, you’ll be able to use every different method according to the input parameters.
Did you know that a very similar – and useful! – feature exists in TypeScript? That feature is function overloading, and it can be used both on base functions and in class methods.
It works pretty much the same as method overloading, but with one key difference: while method overloading allows you to actually create multiple methods with different bodies, function overloading requires you to create just one function, and allows you to associate multiple signatures to it. This means you’ll have to write the function itself so that it’s compatible with every possible signature in order to avoid a type error.
// Multiple signatures:
function someFunction (param: number): number;
function someFunction (param: string): string;

// Implementation of the function:
function someFunction (
  param: number | string
): number | string {
  if (typeof param === "number") {
    console.log("It's a number!");
  } else {
    console.log("It's a string!");
  }

  return param;
}

const val1 = someFunction(42);
const val2 = someFunction(
  "So long, and thanks for all the fish"
);
Having to define only one function body for every signature may seem very limiting, but keep in mind: by declaring your function like this, TypeScript will be able to correctly infer the output type according to the input parameters type. In other words, you won’t have to manually type narrow the result returned by your function.
To demonstrate how helpful this can be, let’s add a few lines to the previous snippet.
// Multiple signatures:
function someFunction (param: number): number;
function someFunction (param: string): string;

// Implementation of the function:
function someFunction (
  param: number | string
): number | string {
  if (typeof param === "number") {
    console.log("It's a number!");
  } else {
    console.log("It's a string!");
  }

  return param;
}

const val1 = someFunction(42);
const val2 = someFunction(
  "So long, and thanks for all the fish"
);

// Valid:
console.log(val1.toFixed());
console.log(val2.length);
In the example above, val1 and val2 are used as a number and as a string respectively. You’re able to do this without any error specifically because of function overloading: TypeScript can tell that someFunction will return a number when it receives a number and a string when it receives a string.
Just for comparison, here’s how things would have changed without using function overloading.
function someFunction (
  param: number | string
): number | string {
  if (typeof param === "number") {
    console.log("It's a number!");
  } else {
    console.log("It's a string!");
  }

  return param;
}

const val1 = someFunction(42);
const val2 = someFunction(
  "So long, and thanks for all the fish"
);

// Not valid: TypeScript is unable
// to infer the output type.
console.log(val1.toFixed());
console.log(val2.length);

// We have to manually type
// narrow the variables:
if (typeof val1 === "number") {
  console.log(val1.toFixed);
}
if (typeof val2 === "string") {
  console.log(val2.length);
}
With even this simple snippet becoming a lot more verbose than before, you can imagine the impact this feature could have on a complex project.
There are several situations where function overloading can be useful. For instance, you can use it when you have a function that accepts either a single value or an array of values as a parameter.
function multiplyValue(
  value: number,
  multiplyBy: number,
): number;
function multiplyValue(
  value: number[],
  multiplyBy: number,
): number[];

// Multiplies a single value of an array of values
// by the second parameter and returns the result.
function multiplyValue(
  value: number | number[],
  multiplyBy: number,
): number | number[] {
  if (Array.isArray(value)) {
    const result = [];

    for (let i = 0; i < value.length; i++) {
      result.push(value[i] * multiplyBy);
    }

    return result;
  } else {
    return value * multiplyBy;
  }
}

const singleValue = multiplyValue(11, 2);
const arrayOfValues = multiplyValue(
  [1, 1, 2, 3, 5],
   5
);

// singleValue is a number:
console.log(singleValue.toFixed());

// arrayOfValues is an array of numbers:
arrayOfValues.forEach((item) => {
  console.log(item.toFixed())
});
(Notice how Array.isArray is a valid type guard, as well.)
No type guard necessary outside of the function body! Isn’t it lovely to be able to type less code?
Closing words
That closes this second article about TypeScript (didn’t read the first part yet? What are you waiting for?!). I hope I’ve been able to make you discover something new, or perhaps to shine some light on a few mechanics many developers never really think about.
If you have some secret TypeScript tools you’d like to share, I can’t wait to know about them. Will a third article ever be published? Who knows!
The post TypeScript: 5 More Tricks for Development first appeared on Oimmei Digital Consulting.
]]>The post 5 useful TypeScript tips & tricks first appeared on Oimmei Digital Consulting.
]]>TypeScript
Oh, TypeScript. The open source programming language developed by Microsoft as a superset of JavaScript doesn’t need any introduction at this point. With tools like React, Angular and Node.js being more and more popular every day, the need to develop robust and easy-to-maintain JavaScript applications is impossible to ignore, and the static typing provided by TypeScript helps a lot in that regard.
If you’re part of the increasingly small group of developers who are yet to adopt TypeScript in their daily work, don’t worry: if you know JavaScript, its statically typed cousin is not difficult to approach. Being a superset, TypeScript can natively compile any JavaScript code – with the exception of some type error -, and allows you to start gradually using its features.
The purpose of this article is not to introduce TypeScript, which would probably be redundant for many of you. Instead, I want to show off some interesting features I learned while working with Anders Hejlsberg’s language. TypeScript offers a lot of tools besides the most obvious ones, and they may surprise even developers with a fair share of experience with it. They can be useful to make our projects even more robust and readable or to save some unnecessary code.So, here’s 5 tips and tricks you can use with TypeScript, starting with the most popular and well-known and then going down to the most obscure and situational ones, all tested on the current version of the language (4.8) and with full examples on the official playground.
Utility type: Omit e Pick
Utility types are utilities – duh – globally available in every TypeScript application. They are tools that, given a type A, like an interface, can create a type B as a somewhat modified version of A.
There are a lot of utility types and they’re well documented in the official documentation, so in this article I’ll just show off two of the ones I’ve ended up using the most in our own projects. Omit is a utility type that, given a type A with a bunch of properties, creates a type B with all the properties from A except the ones provided in its definition.
// Starting type:
interface TypeA {
  id: string

  name: string

  description: string

  price: number
}

// New type created from the starting one, excluding the properties description and price:
type TypeB = Omit<TypeA, "description" | "price">;

// Creating a TypeB object:
const objB: TypeB = {
  id: "1001", // OK.

  name: "Name", // OK.

  description: "Description", // Invalid: this property doesn't exist in TypeB.
}
This utility can be really useful if you need to create partial objects of a specific type while also taking advantage of the constraints provided by the type itself, like the mandatory properties. Thus, Omit can be more robust and specific than Partial, which just makes every property of a type optional, although it’s a little harder to use.
Omit is also helpful for code reuse. Picture this: somewhere in your application, potentially in a library, there is a TextInputProps type, which is an interface for the property of a text input field. You want to create a new input type, which works the same as the other one but only handles numbers instead of strings. You’d like to be able to just extend TextInputProps to change the type for the property value, but…
interface TextInputProps {
  label: string

  name: string

  value: string
}

interface NumberInputProps extends TextInputProps {
  value: number
}
Oh no! You can’t extend the interface because the types aren’t compatible! What now? Do you have to replicate the whole interface, or create a new one to encapsulate the common fields?Not necessarily: Omit comes to your aid.
Instead of extending TextInputProps, you can extend a modified version which includes every property except for value. This allows you to redefine the property without any issue, even if you’re not meeting the constraint of the starting type. Keep in mind the new interface won’t be an actual extension of the starting one anymore in terms of object-oriented programming – in other words: NumberInputProps objects won’t be TextInputProps objects -, but it’s not a problem in this case.
interface TextInputProps {
  label: string

  name: string

  value: string
}

interface NumberInputProps extends Omit<TextInputProps, "value"> {
  value: number
}
One less thing to do before you can go home and turn on your PlayStation! Woo-ooh!*
As I’m sure you’ll have guessed, Pick works in the opposite way, meaning it creates a type B with only the given subset of type A, and it’s just as useful.
// Starting type:
interface TypeA {
  id: string

  name: string

  description: string

  price: number
}

// New type created from the starting one, with just the id and name properties:
type TypeB = Pick<TypeA, "id" | "name">;

// Creating a TypeB object:
const objB: TypeB = {
  id: "1001", // OK.

  name: "Name", // OK.

  description: "Description", // Invalid: this property doesn't exist in TypeB.
}
(*Note for all the mr. and mrs. Know-it-all who were already typing their comments: yeah, I know, this problem would be way better solved with generics type. It was just an example to explain the feature, ok? Keep your hands off the keyboard and I won’t humiliate you in Elden Ring PVP tonight.)
Using the type of a property
This one is really simple, but still useful in order to avoid code replication.
Here’s a typical situation in a relatively complex TypeScript project: you have an interface, and this interface has a bunch of properties, each with its own type. You have to create a new object implementing this interface, but one of the values is difficult to calculate, and you want to use a different variable before setting it in the object itself. The question is: how can you give the correct type to said variable?
The easiest answer is to just repeat the type of the property when you declare the variable.
// Interface:
interface SomeInterface {
  id: number

  code: string

  name: string
}

// Declaring a variable in order to calculate the value for code:
let code: string; // <- Repeating the type

// An incredibly and overwhelmingly complex initialization logic:
code = "CODE";

const someObject: SomeInterface = {
  id: 1,
  code: code,
  name: "Name",
}
However, this repetition is actually unnecessary. When you have a type with some properties, such as an interface, TypeScript allows you to reference the type of a specific property by using the square bracket notation, just like you were accessing a common JavaScript object.
// Interface:
interface SomeInterface {
  id: number

  code: string

  name: string
}

// Declaring a variable in order to calculate the value for code:
let code: SomeInterface["code"]; // <- No repetition!

// An incredibly and overwhelmingly complex initialization logic:
code = "CODE";

const someObject: SomeInterface = {
  id: 1,
  code: code,
  name: "Name",
}
Only square brackets, though. Don’t try it with the dot notation.
With this solution, the interface will be the only one keeping the information about the type of the property, and if said type ever changed in the future you’d have one less line of code to worry about. Let’s be clear: if the property switches to a new type that’s incompatible with the old one you’ll still have to fix the initialization, but you won’t have to change the static type for the declaration of the variable.
Likewise, you can access the typing of the element in an array type by using the type of its index, meaning number.
// Interface:
interface SomeInterface {
  id: number

  code: string

  name: string
}

// Declaring an array of SomeInterface objects:
type SomeInterfaceArray = SomeInterface[];

// Using the array type to get the element type:
const someObject: SomeInterfaceArray[number] = {
  id: 1,
  code: "CODE",
  name: "Name",
}
Type narrowing: discriminated union
This is one of my personal favorites, and a very interesting one for those who are used to traditional object-oriented programming languages.
First of all: I don’t think union types are a mystery to any TypeScript developer. It’s the feature that allow you to create a new type by combining existing types with the pipe operator (|).
// Union type:
type SomeUnion = string | boolean;

// Valid:
const someVariable1: SomeUnion = "String";

// Valid:
const someVariable2: SomeUnion = false;

// Not valid:
const someVariable3: SomeUnion = 10;
Creating a union type using values instead of types is also a well-known feature, since scalar values are considered valid types by TypeScript. This means you can type a variable or a property to have one of a specific list of values, for example one of three strings.
// Union type:
type SomeUnion = "string_1" | "string_2" | "string_3";

// Valid:
const someVariable1: SomeUnion = "string_1";

// Not valid:
const someVariable2: SomeUnion = "string_5";
It’s all pretty boring so far, but give me a moment: here comes the fun part. Did you know you can use union types in order to discriminate between different types and take advantage of static typing for them? That’s a little convoluted, I know. Let’s make another example.
Let’s say your project calls or exposes a REST API. The API response structure includes:
- a status, SUCCESS or FAIL;
- the body data, whose type doesn’t matter here;
- an error_message string, which gives the caller some description of any error occurred. The response will contain error_message only when its status is FAIL.
How could you model this structure into your project?Thinking about the typical object-oriented style, you could end up with an interface like the one below, with status that can assume either one of the two values and the optional field error_message.
interface ApiResponse {
  status: "SUCCESS" | "FAILURE"

  data: any

  // Will only be valued on FAILURE.
  error_message?: string
}
The disadvantage here is that you have no static validation for error_message. You have to make sure the field is only valued when it should, and if you do something wrong you won’t realize it before debugging.
interface ApiResponse {
  status: "SUCCESS" | "FAILURE"

  data: any

  // Will only be valued on FAILURE.
  error_message?: string
}

// Valid: the compiler is unable to tell this is wrong.
const response: ApiResponse = {
  status: "SUCCESS",
  data: {},
  error_message: "An error message"
}
Luckily, union types unlock a powerful alternative to solve this problem: discriminated unions, which are part of the broader type narrowing topic. A lot could be written on type narrowing, but let’s just say it’s the group of features that allows TypeScript to figure out the type of a certain variable given your type handling and the flow of your application. Let’s use discriminated unions to refactor the previous example like this.
- Instead of one interface, let’s create two: one for a successful response and one for a failure response.
- For ApiSuccessResponse, let’s type status so it can only have SUCCESS as a value, and let’s not include error_message at all. For ApiFailureResponse, status will only have FAIL as a value and error_message will be a mandatory string.
- Finally, let’s create a third interface ApiResponse as a union of the previous two.
Here it is.
interface ApiSuccessResponse {
  status: "SUCCESS"

  data: any
}

interface ApiFailureResponse {
  status: "FAIL"

  data: any

  error_message: string
}

type ApiResponse = ApiSuccessResponse | ApiFailureResponse;
With this typing, the compiler can discriminate between the different types of response, and will be able to statically tell you if error_message should be there, for both write and read access.
interface ApiSuccessResponse {
  status: "SUCCESS"

  data: any
}

interface ApiFailureResponse {
  status: "FAIL"

  data: any

  error_message: string
}

type ApiResponse = ApiSuccessResponse | ApiFailureResponse;

// Not valid: a SUCCESS response can't have an error_message.
const response1: ApiResponse = {
  status: "SUCCESS",
  data: {},
  error_message: "An error message",
}

// Not valid: a FAIL response must have an error_message.
const response2: ApiResponse = {
  status: "FAIL",
  data: {},
}

// Valid:
const response3: ApiResponse = {
  status: "SUCCESS",
  data: {},
}
const response4: ApiResponse = {
  status: "FAIL",
  data: {},
  error_message: "An error message",
}
Rassicurante, non è vero?
Const assertion (array of values as a union type)
Union types sure are handy, but there’s one significant downside to them: being a part of static typing, any data about the possible values a union type allows is lost during the compilation process and can’t be used at runtime. This means, among other things, that you can’t loop over the values of a union type, and there’s no way to check whether an untrusted value is allowed.
If your project needs a group of values you can use both statically and dynamically, you’re most likely better off using an enum. TypeScript enums allow you to define a group of named constants which are used by the compiler to check for the validity of types and, unlike union types, are also available at runtime.
However, a similar result can also be achieved with an array of scalar values, like an array of strings. To do that, you need to take advantage of the const assertion construct. What is that, you may ask. Why, thanks for the question, that’s just what I’m here for.So: whenever you declare and initialize a variable without explicitly typing it, TypeScript will infer an adequate type for said variable on your behalf according to the provided value. An array of strings will therefore be typed as a string[]. You can check that out yourself in the Playground: just click on the “.d.ts” tab.
const array = ["string_1", "string_2", "string_3"];

// Inferred type:
// declare const array: string[];
By using a const assertion, you can control this behavior. Const assertions ask TypeScript to infer the most restrictive type possible given the provided value. Thus, an array of strings initialized with a list of values will be typed as a read-only array, with a specific length, which contains specifically the provided values, each of them at a specific index – kind of a tuple, if you will.
const array = ["string_1", "string_2", "string_3"] as const;

// Inferred type:
// declare const array: readonly ["string_1", "string_2", "string_3"];
Such an array can still be used in the code, to loop over the values inside or to check if some other value appears in the list, but thanks to the const assertion you can also create a union type out of it.
const someArray = ["string_1", "string_2", "string_3"] as const;

type SomeUnion = typeof someArray[number];

// Valid:
const someVar1: SomeUnion = "string_1";

// Not valid:
const someVar2: SomeUnion = "string_5";

// You can still use someArray as a regular array:
if (someArray.indexOf("string_1") !== -1) {
  console.log("This is valid!");
}
for (let i = 0; i < someArray.length; i++) {
  console.log(someArray[i]);
}
This lets you combine the pros of having an array of values, really useful if you need Yup validation for instance, and all the good stuff coming from having a union type, like static typing for property values and autocompletion from your IDE.
Template/Dynamic union types
Wow, yet another tip on union types! What were the odds?
As we already saw, union types can be used in order to create variables or properties that can take one of a list of scalar values.
// Union type:
type SomeUnion = "string_1" | "string_2" | "string_3";

// Valid:
const someVariable1: SomeUnion = "string_1";

// Not valid:
const someVariable2: SomeUnion = "string_5";
This is useful, but kind of limiting, since you can only use the values in the list with no variation whatsoever. Everything that’s not part of the list will cause a type error and TypeScript will refuse to compile.
Now, let’s say you have a string that can take one value from a list that includes a bunch of very similar but not entirely static values. For instance, you may have an algorithm which makes a few attempts to perform a task that may fail, and you want to create a variable to keep the status of the algorithm.
Let’s create a status variable, its possible values being:
- none when no attempt was performed;
- success if the task was successfully completed;
- fail if the task failed;
- attempt_N, with N being the counter for the current attempt (attempt_1, attempt_2, attempt_3…), while the algorithm is running.
Using union types the old-fashioned way, you may end up explicitly writing down the static values and just leaving a generic string for the last ones…
// Union type for the status:
type StatusType = "none" | "success" | "fail" | string;

// This is valid...
const status1: StatusType = "none";
const status2: StatusType = "attempt_3";

// ...but this is valid as well.
const status3: StatusType = "Hey, I'm not a status at all!";
…but that’s not the only way. The string values defined for a union type can actually have dynamic parts, which we can control by simply concatenating dynamic parts and static parts with template strings.
// Union type for the status:
type StatusType = "none" | "success" | "fail" | `attempt_${number}`;

// This is valid...
const status1: StatusType = "none";
const status2: StatusType = "attempt_3";

// ...but this one isn't.
const status3: StatusType = "Aw :(";
Further examples can be found here.
We love you, union types <3
Closing words
Approaching TypeScript is an interesting experience for a developer used to traditional object-oriented programming languages. Being it a superset of a non-statically typed language such as JavaScript, the team developing it was able to find a lot of ways to tackle every sort of issue, and even after some time working with it you still happen to discover something new every once in a while.
I presented to you some features I found out to be useful during my work, hoping they may help you too. I’m sure I’ll find more of them in the future.
What do you think? Did you actually learn anything new, or did you already know about every tip? Do you have any of your own tips you’d like to show to the rest of us? Let me know, and maybe one day I’ll make a sequel!
The post 5 useful TypeScript tips & tricks first appeared on Oimmei Digital Consulting.
]]>The post 7 reasons why Slack is the perfect tool for smartworking first appeared on Oimmei Digital Consulting.
]]>If you don’t know it, it’s a company collaboration tool, both for team organization and work management and communication about projects in progress. A tool that aims to enhance the productivity of the work group, keeping the members in contact and focused on the work goals.
This tool is ideal for remote work because its features keep you in contact with your colleagues and clients both on your smartphone and pc, removing the hassle of multiple email chains to discuss a project or contact the client.
Here are 7 great reasons why Slack is indispensable for smartworking:
- Channels: to organize your work. They can be created for a topic, a team or a project. This way conversations will remain focused on a single topic.
- Videocalls: perfect for remote meetings, with the team or with a client. Slack also allows screen sharing to show what you’re talking about.
- Saved elements: only you can see them and they’re useful to save conversations or files to look more into them later.
- Integrate apps: this tool allows you to connect multiple apps to make your work more productive.
- Privacy and security: private channels and data protection to make your work safe.
- Multiplatform: this feature is essential to always be ahead of the game, in fact it is easy to use on both your desktop and smartphone.
- File: this tool was born for working, so it supports file sharing of any kind and size.
The post 7 reasons why Slack is the perfect tool for smartworking first appeared on Oimmei Digital Consulting.
]]>The post World Backup Day: save your data! first appeared on Oimmei Digital Consulting.
]]>Today is surely the best day to backup your files and schedule the next one… you can’t wait for the next World Backup Day! And if you’re not convinced, here is some information that will make you want to dust off your hard drives!
The backup
We all know what a backup is and how important it is to preserve the data and files we don’t want to lose. Let’s not forget that it is useful for both your pc and smartphone, which will be unloaded and will run faster and more efficiently.
There are mainly two methods to secure your files and data: some prefer using an external support, like a sizable hard drive, while some people prefer to do it online, with the classic Dropbox or Google Drive (which still only have limited space) or with a paid cloud storage service, very useful for work and companies. There are also people who want to be 100% secure and use both!
The importance of securing your data
According to the “2020 Cyber Protection Week Survey” Acronis carried out on 3000 people in 11 countries around the world, 91% of the people interviewed admit to performing their backup once a year. It sounds like a good percentage but think about how many things we do with our smartphone or computer in 365 days. Pictures, texts, important documents, projects… and much more. Are we sure once a year is enough?
Let’s especially think about the risks our data and files are vulnerable to: virus attacks, losing your phone, your computer breaking, or a simple error that deletes the document you’ve been working on for days! There are also cyber security dangers, which these last few years have been talked about in the papers (which thanks to their “popularity” have made users more alert: 88% of users are working on bettering their privacy and online security!)
The post World Backup Day: save your data! first appeared on Oimmei Digital Consulting.
]]>The post Executing tasks after an HTTP call with Symfony first appeared on Oimmei Digital Consulting.
]]>The post Executing tasks after an HTTP call with Symfony first appeared on Oimmei Digital Consulting.
]]>The post Climb the rankings of Modigliani Livorno first appeared on Oimmei Digital Consulting.
]]>Check your progress and world ranking among the users who, like you, are exploring the city, and become the best Modì Explorer!
As we have explained in the previous article (click here if you missed it!) Modigliani Livorno app is a game and it challenges you to find secret locations in Livorno, solve clues and discover hidden objects.
All this generates points that will allow you to climb the rankings while challenging the users who, like you, are exploring the city and trying to become the best Modì Explorer.
The score calculation is influenced by how many locations and objects you have found but also how long it took you to do it: if someone was faster than you to solve a clue and find a hidden object, they will score higher than you!
In the Progress section you will be able to check where you are in the exploration, how many locations you still have to find. You will also be able to see your score and ranking, discovering the score of your rivals.
Ready to be number 1?!?!
Discover the website dedicated to our app https://livorno.modigliani.app
The app is free, have fun playing!
Android – iOS
The post Climb the rankings of Modigliani Livorno first appeared on Oimmei Digital Consulting.
]]>The post Play with Modigliani Livorno first appeared on Oimmei Digital Consulting.
]]>Here are the instructions to best play it!
The real heart of the app is the map, which you can access by clicking the Locations button, between The History and Ranking, which you can see in the bar on the bottom of the screen.
You will be asked to choose your nickname, the name you will be identified in the game with. You can choose the default one or edit it in the Ranking section.
From the map the exploration of Livorno will begin, the search of the locations that can tell you something about the life of Amedeo Modigliani.
Here is a guide to learn how to best play with out app!
Step 1 – The first 5 places to discover
There are 5 places marked with a symbol on the map. You will have to reach them physically, exploring the city, to find out what they have to tell you about Modigliani and how they can help you discover other places related to the artist.

- In order to play it you have to be in Livorno… no such thing as a long distance treasure hunt, right?
- The starting point for the exploration are the places you will find on the map, marked by some colorful symbols. There are 5 of them in five different colors (blue, red, yellow, green and light blue), and each of them is positioned on the map to mark the spot you will have to physically reach.
- By clicking on one of the symbols on the map, you will be able see the address to help you reach it.
- Once reached, every location will show you a text that will tell you something about the artist.
Step 2 – Discover the secret places
The main locations will unlock more secret places near them. To complete the exploration of the area, which means discovering all the places marked with the same color, find the secret locations!

- When you reach one of the visible locations, you will unlock the points of interest around them, which are the secret locations. They are identified by areas marked with the same color of the main location.
- By reaching each area, you will find the secret location and unlock new text content which will tell you why that place is important to Modigliani. The secret location you discover is marked on the map with a symbol in the color of the area you’re exploring, with a key inside.
- Find all the secret locations to complete the exploration of the area.
Step 3 – Clues and hidden objects
Once you have found all the locations in the area you are exploring, the game gets harder: the clues come in! If you can solve them, you will be able to find the hidden objects!

- You have found all the secret locations and you have completed the exploration of the area.
- Now challenge yourself with the clues: they’re riddles you need to solve to know where we hid some objects tied to Modigliani.
- If you guess where the object is hidden, reach the location and see if you got it right!
- When you’ve discovered all the secret locations in all the areas to be explored, solved all the clued and found all the secret objects… the last clue will lead you (if you’re good!) to the last hidden object, the most important one!
Let the drawer help you!

To guide you in the exploration, use the drawer, which you can access by dragging up the grey bar on the bottom of the map. It’s a precious tool that will help you know your progress! Here is what you can find in the drawer
- The main locations to start from, with the addresses
- A short sentence that will give you directions on how to proceed
- If you see many question marks it means that the area is still unexplored
- Brush: you found the first location, the visible one
- Key: you found one or more secret location(s)
- Magnifying glass: you found the clue
- The last symbol is the hidden object… which we won’t tell you, as not to spoil your fun!
- If the symbols are flashing, it means you haven’t read the text they give you access to. Click on the flashing symbol to read the article or clue.
Well, are you ready to really play?
Download the app and challenge yourself today!
Discover the website dedicated to our app https://livorno.modigliani.app
The app is free, have fun playing!
Android – iOS
The post Play with Modigliani Livorno first appeared on Oimmei Digital Consulting.
]]>The post Modigliani Livorno. All about Modigliani’s life and career first appeared on Oimmei Digital Consulting.
]]>In the app Modigliani Livorno, if you want to know more about the artist before launching yourself in the research of places significant to Modigliani, tap on History. Here, divided in chapters, you can retrace the history of Amedeo Modigliani and his artistic career. It’s not just a simple recount, as we also thought of highlighting the most important moments of the life of the young livornese artist, the places where he lived and the ones that were crucial to his personal and artistic experience, and the fundamental episodes to understand who Modigliani was.
You will find many well-known informations, but maybe some that you didn’t know or more peculiar ones as well.
We will give some examples, without giving away too much or we will rob you of the joy of discovery!
The Garsin family was really cultured. His mother Eugenia and grandfather Isacco managed young Amedeo’s cultural education, in fact he was noticed thanks to his knowledge of literature and philosophy and his proficiency in the French language.
Modigliani had the chance to visit many locations: central-south Italy, Florence, Venice, Paris, the south of France. Each of these places contributed in creating a vast wealth of artistic models that was the origin of his unique style.
Modigliani did not love painting landscapes, which is why we have very few samples of landscape pieces from him: one from his time in art school and some during his last few years of life.
These are some of the curiosities and insights that you will find in the History chapters.
To discover them all, download the app!
Discover the website dedicated to our app https://livorno.modigliani.app
The app is free, have fun playing!
Android – iOS
The post Modigliani Livorno. All about Modigliani’s life and career first appeared on Oimmei Digital Consulting.
]]>The post Modigliani Livorno. The app you can’t miss! first appeared on Oimmei Digital Consulting.
]]>The app that will lead you to discover the Livorno of Amedeo Modigliani, a tour to get to know the artist and his hometown.
Free and available for iOS and Android, Modigliani Livorno is waiting for you in the stores!
Amedeo Modigliani was born in Livorno but he was never very present in his hometown and was often more known for the legend surrounding him than for his real story. If you think of Modigliani you think of Paris and few people know the importance of Livorno in his life. This is not only where he was born, but also where core events of his life happened, where he met key figures that shaped his future and where he got his education, both cultural and artistic.
So, we asked ourselves: why not create an easy to use, innovative and engaging tool that will let everyone better know this artist and his history linked to Livorno? A gift to our city and a tribute to the great livornese artist.

Thus the Modigliani Livorno app was born, a free app available for iOS and Android, which will accompany you to to discover the locations significant to Modigliani in Livorno. A tool that proposes an interactive and innovative approach to the artistic and cultural world, in which the user can feel at the center.
Because the app not only invites you to go to the locations in Livorno that we chose as the most significant in the life of the artist and that we’ll tell you about textually, but it also invites you to have fun. Other than the locations, in fact, there are hidden objects that will complete your research, but they won’t be that easy to find: there are some riddles to solve! Each location discovered and each hidden object found will let you accumulate points and climb the rankings of users who are exploring Livorno like you.
Not only curiosities and insights but also engagement and fun.
This app involved each department in the Oimmei team and we’re very proud of it. We hope you like it as much as we do!
Discover the website dedicated to our app https://livorno.modigliani.app
The app is free, have fun playing!
Android – iOS
The post Modigliani Livorno. The app you can’t miss! first appeared on Oimmei Digital Consulting.
]]>